Please Refer to “Create a simple spring boot application” for creating the spring boot application first. Then we are going to customize it to create a basic REST API using Spring Boot.
If we look at the pom.xml, we have spring-boot-starter-web and spring-boot-starter-test added as dependency and spring-boot-starter-parent as the parent. They bring in lot of transitive dependencies along with them.
<parent>
<groupId>org.springframework.boot</groupId>
<artifactId>spring-boot-starter-parent</artifactId>
<version>2.6.4</version>
<relativePath/> <!– lookup parent from repository –>
</parent>
<dependencies>
<dependency>
<groupId>org.springframework.boot</groupId>
<artifactId>spring-boot-starter-web</artifactId>
</dependency>
<dependency>
<groupId>org.springframework.boot</groupId>
<artifactId>spring-boot-starter-test</artifactId>
<scope>test</scope>
</dependency>
</dependencies>
Table of Contents
Step 1 : Creating controller class
First of all, we will create some a package named controller. This is just a way of logically organizing the code. I am naming the package as com.dreamers.springboot.demo.controller.
Let me create a REST API to add, fetch, delete student in a database.
So, here student is the name of resource and my controller class is named as StudentController. I am annotating it with @RestController and @RequestMapping as below
@RestController
@RequestMapping(“/api/v1/student”)
public class StudentController {
}
Why are we using @RestController instead of @Controller?
@RestController is a special annotation which combines @Controller and @ResponseBody. As we saw in our last example while returning custom message, we had to annotate a method with @ResponseBody to serialize the object and return it using Http, we are annotating the class with @RestController here. Thus, we do not have to annotate class with @ResponseBody separately.
Step 2 : Creating methods to map with specific request
I am creating a method which will take a json as body of request and store it in database.
@PostMapping()
public ResponseEntity<?> addStudent(@RequestBody Student student) {
}
We are annotating the class with @PostMapping.
What is @PostMapping?
PostMapping is an annotation which handles request sent using POST method having the URI as the one in RequestMapping at the class level followed by any string within the PostMapping annotation. In our case as the annotation is not having any value in it, so the URI in the RequestMapping annotation will be used. So the URI is /api/v1/student with a HTTP method of POST
What is @ResponseEntity?
@ResponseEntity is a spring framework annotation which is an extension of HttpEntity and allows as to add HttpStatus code.
What is @RequestBody?
The annotation @RequestBody is used in spring to deserialize a byte stream sent as body of Http Request, into an object. In our case, whatever student detail is passed as body of the POST request, it gets deserialized and stored into the object of Student class.
Step 3: Create a model class
As we are passing some data as body of the request, we are creating a model class in the model package (just to organize the code). This model class is defining the structure of request which the API can accept and also return in case of a GET request.
public class Student {
public int studentId;
public String studentName;
public String guardianName;
public int getStudentId() {
return studentId;
}
public void setStudentId(int studentId) {
this.studentId = studentId;
}
public String getStudentName() {
return studentName;
}
public void setStudentName(String studentName) {
this.studentName = studentName;
}
public String getGuardianName() {
return guardianName;
}
public void setGuardianName(String guardianName) {
this.guardianName = guardianName;
}
@Override
public String toString() {
return “Student [studentId=” + studentId + “, studentName=” + studentName + “, guardianName=” + guardianName
+ “]”;
}
}
This defines that our API can accept only these 3 fields and anything passed extra will not get assigned to the object.
Step 4: Write the body of the controller method
We are adding 2 lines for the time being. First for logging the object of student to ensure that whatever has been passed, reached our method and second is to return an object of ResponseEntity with a status code of 201 which means created.
public ResponseEntity<?> addStudent(@RequestBody Student student) {
logger.info(student.toString());
return new ResponseEntity(student,HttpStatus.CREATED);
}
Step 5 : Restart the server and open Postman
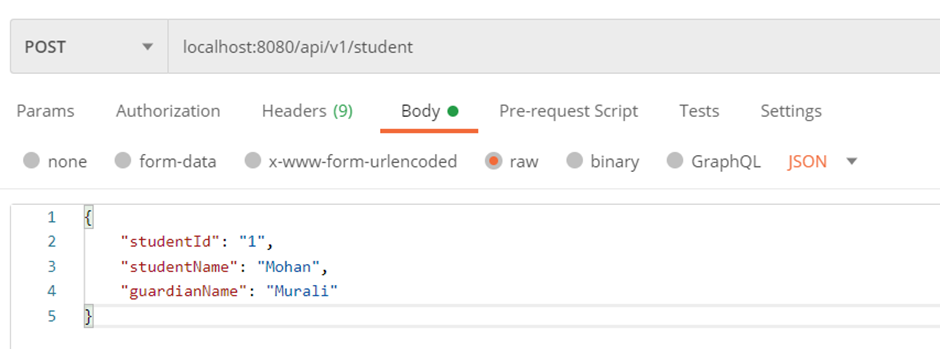
Postman is an application which can used to send API requests and see the response. This is a very popular tool and can be used for testing APIs.
As our server started on port 8080 (the default port), so we are using URL: localhost:8080/api/v1/student
As body of the request, we are passing the following json.
{
“studentId”: “1”,
“studentName”: “Mohan”,
“guardianName”: “Murali”
}
Now on hitting the URL using POST method as below
We are getting the details of object in log as below
c.d.s.demo.controller.StudentController : Student [studentId=1, studentName=Mohan, guardianName=Murali]
and response as below
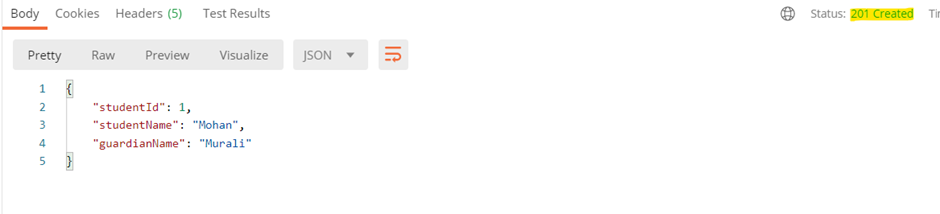
So, a basic REST API is ready. Now we will enhance it to store the data in database and retrieve from there in our next section.